Behind the Sounds
From the excellent site SoundWorks Collection, here are a handful of video essays discussing sound design in the animated features Inside Out, The Little Prince, and How to Train Your Dragon 2.
Behind the Sounds
From the excellent site SoundWorks Collection, here are a handful of video essays discussing sound design in the animated features Inside Out, The Little Prince, and How to Train Your Dragon 2.
Digging Deeper
Hidden meanings and conspiracy theories abound in these videos that delve into cartoon mysteries.
Here are a few random tips and techniques that may help you as you work on your mid-semester projects.
Run Cycles
Animating a run cycle is very similar to animating a walk cycle, although the poses are slightly different. Animator Alan Becker, who summed up walk cycles so nicely, breaks the run cycle down into the following components: the “contact” pose, where the heel of leg one is just meeting the ground and leg two is the farthest back and elevated; the “passing” pose, where leg one is bent and moving back and leg two is passing it from behind; the “kickoff” pose, where leg one is now back and pushing the figure up and leg two is forward and elevated; and the “up” pose where both legs are in the air, leg one back and leg two forward. These then cycle again until leg one is back to its original position and the cycle can be looped. Much like the walk cycle, the arms swing in the opposite direction of the legs, so the left arm is forward when the left leg is back and so-on.
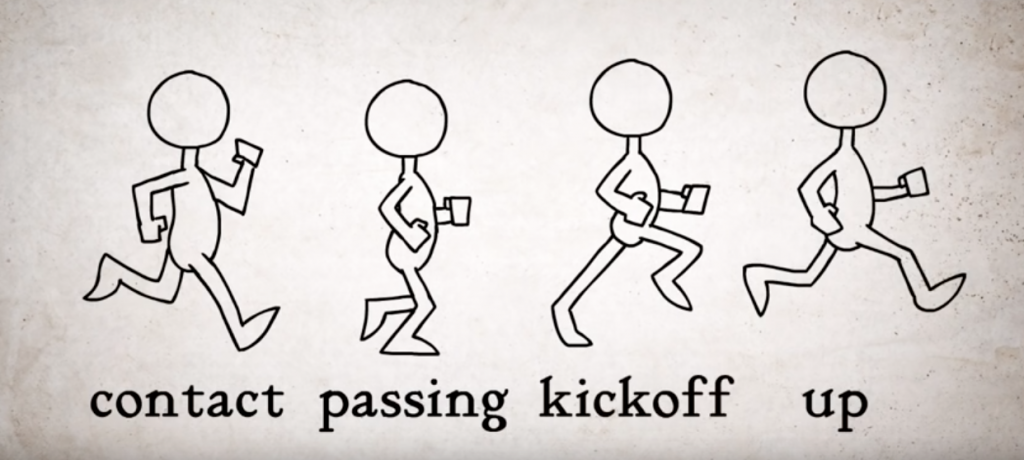
The same tips for animating walk cycles apply to run cycles: go slowly, animate one limb at a time instead of everything at once, rearrange your workspace for maximum efficiency, don’t feel frustrated if it doesn’t look right at first. This kind of movement is challenging to animate, but it’s a terrific learning experience.
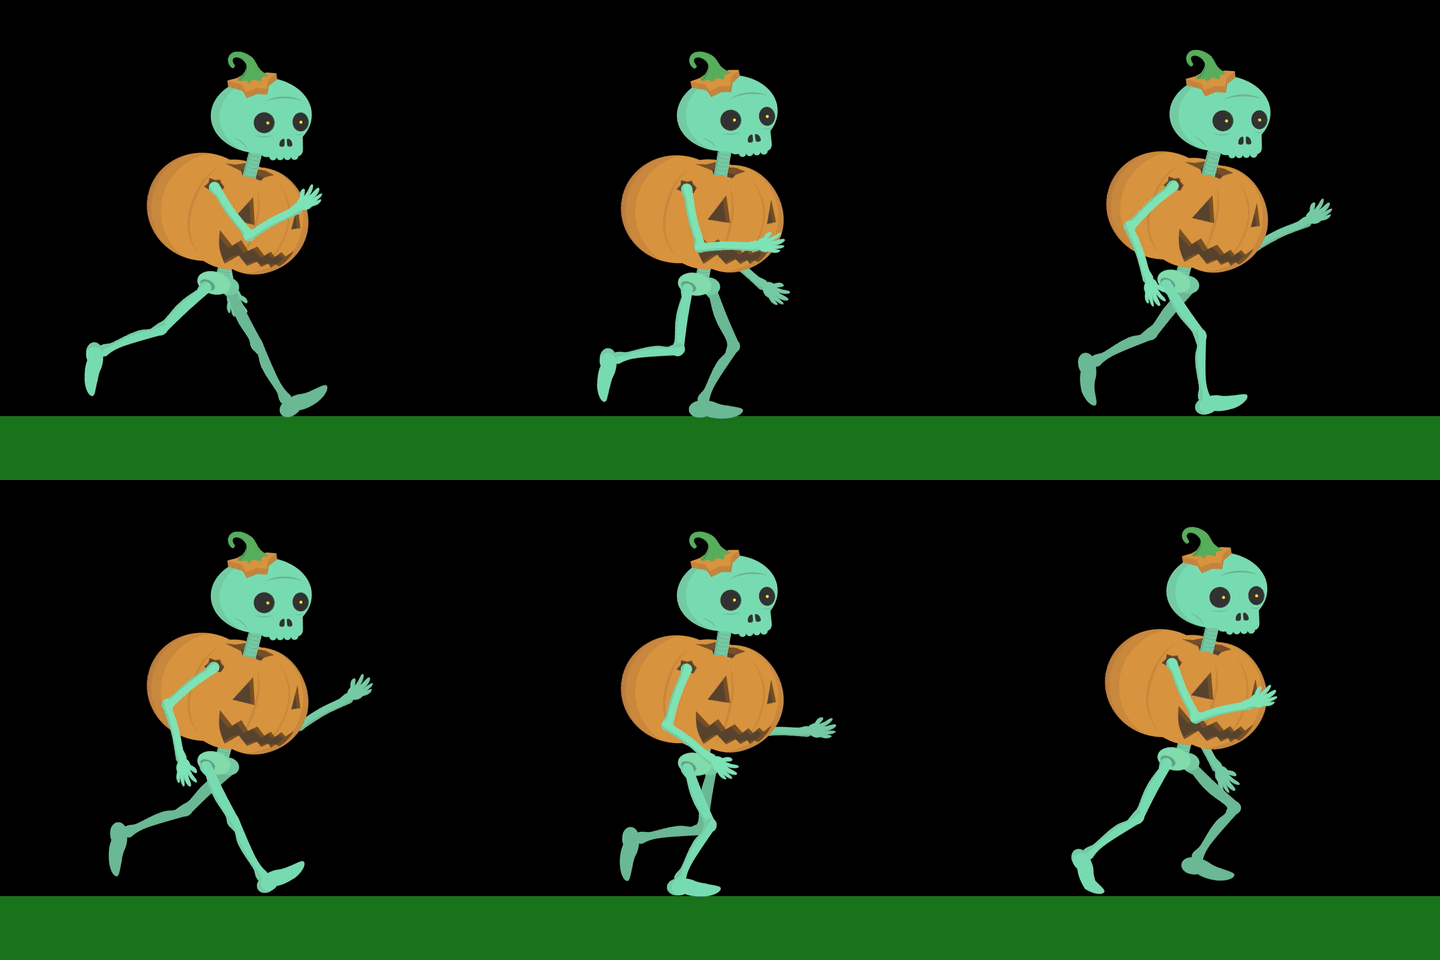
When you have your run cycle completed, you can loop it in the same ways we looped the walk cycle: by copying and pasting the keyframes, duplicating the composition, or using an expression.
Here are a few reference drawings by master animator Richard Williams.
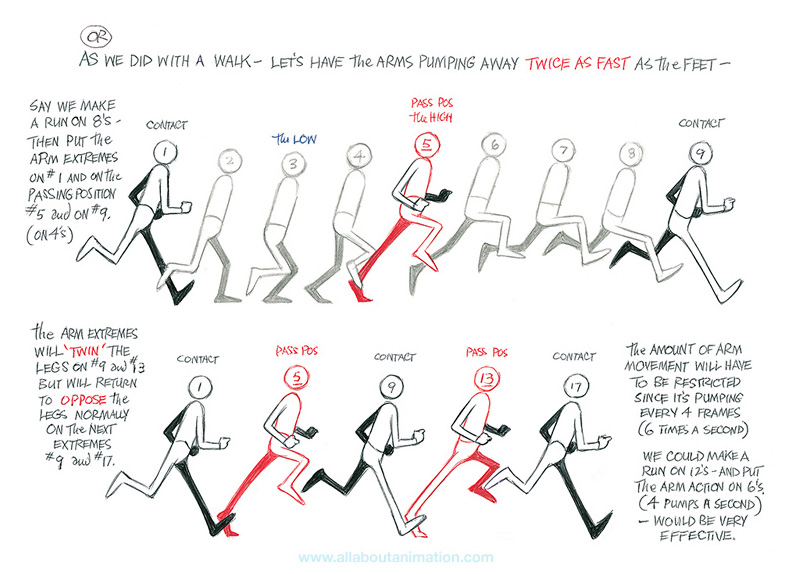
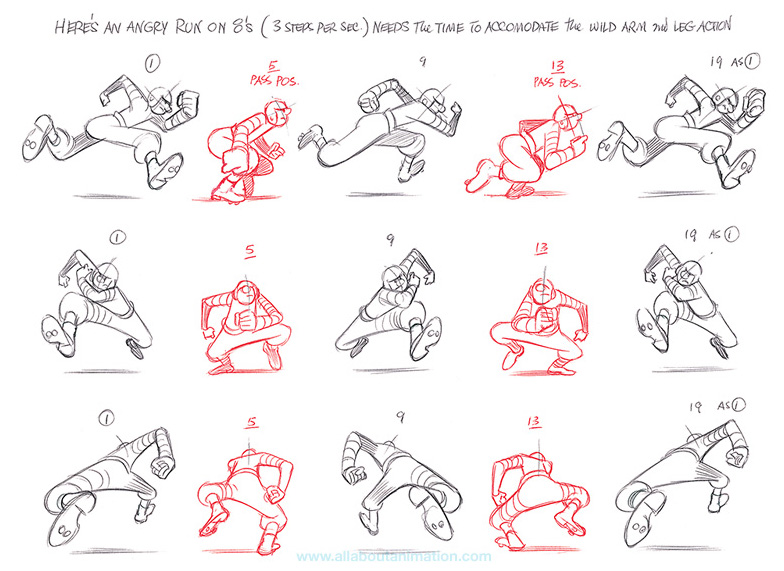

Fake It
If animating a full walk or run cycle is feeling overwhelming, you might want to consider some creative ways of “cutting around” those kinds of movements. The fact that your character is moving from one location to another does not mean that you need to show a full-body walk cycle in all its complexity. Instead, feel free to use editing to hide movements that are too complicated, time-consuming, or confusing to animate.
Here are two shots of a character walking. In the first, the entire body is animated doing a full walk cycle. Note the number of layers that have keyframed animation in the timeline – this character has seventeen body parts all moving in tandem with either their position or rotation (or both) keyframed.

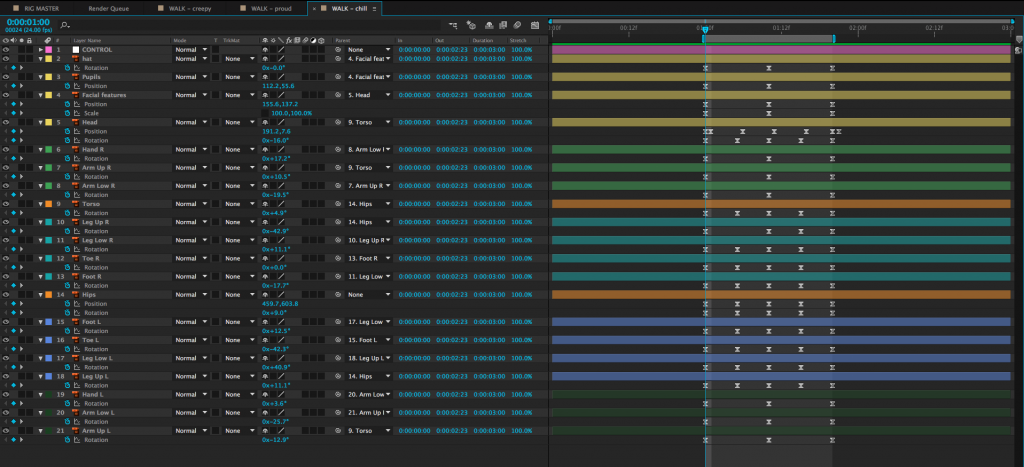
To simplify this walk, we can zoom in on the character so that the legs are no longer visible and animate their position from one side of the screen to the other. This achieves the same basic effect – we see the character walking – but it can be done by animating only three layers. The changing position along with the swinging arms are enough to suggest that the character is walking.


Now, I want to make it clear that I am not suggesting that you should always take the easy way out when it comes to animation. Things like walk cycles are important to master. Animation is always a time-consuming process, though, and the finished piece is more important that its components. If you can achieve the same effect using a quick and simple method or a slow and complex method, why not give yourself a break? Stay true to your vision, but don’t make the process harder than it needs to be.
Multiple Views
Depending on your project, you may need multiple versions of your puppet. If your character appears from the front and back, you’ll need to create front and back versions; if your character appears in profile, you’ll need to create a side-view version.
There’s no real formula for creating multiple versions of a character; to some extent, it’s dependent on your own artistic ability. As always, use lots of reference images to get the design, proportions, and perspective correct.
One thing that I have personally found immensely helpful is to create one version of a puppet from another. If you are working in Photoshop or Illustrator, this is pretty straightforward. Just open up the existing puppet, save the file as a new version, and start modifying what you have. You want to pay particular attention to things like the height of the eyes and overall dimensions of the character. It may be useful to draw some guidelines to keep everything aligned.
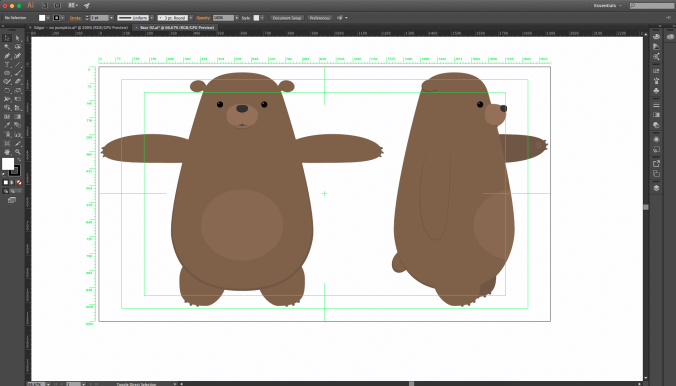
I mentioned this previously, but if you really want to avoid doing multiple versions of the same character, I find the “three-quarter” view the most versatile, since it allows the character to face forward, but still be animated in a walk or run cycle. If you’re having trouble getting a certain perspective on your character just right, there is absolutely no shame in reimagining a shot or sequence to work with a different angle. These kinds of issues are precisely the reason that animation is planned so meticulously in advance.

3D Head Turns and Bounce
The characters that we’re animating in After Effects are two-dimensional, but we can still give the illusion that they exist in 3D space. One simple way of doing this is by subtly moving the features around on a character’s head. Animator Ross Plaskow covers this technique in the tutorial below, with his typical wit, clarity, and profane snark.
If you really want to take your animation to the next level, there are some slightly more advanced techniques that you can incorporate. In a walk or run cycle, for example, you can offset the animation of the head or hands so that they drag slightly behind the movement of the torso and arms. This gives visual interest and physicality to the animation.
You can also add “bounce” to your animation. Adding a few frames of anticipatory movement or recoil can make a simple movement seem a lot more alive. Again, Ross Plaskow has a helpful and entertaining tutorial.
https://youtu.be/SHflOdP_f08
Adding Audio
We’re not doing any synchronous audio just yet – the mid-semester project is essentially a silent movie. You may, however, add sound effects, music, and tone. After Effects makes it pretty easy to add audio to projects; it accepts a variety of formats and they can be dropped into the timeline just like any other piece of media.
With your audio in the timeline, you’ll have access to a few new options. Instead of a “visible” icon (the eyeball on the far left side of the timeline), the is an icon that looks like a little speaker. Clicking this icon makes the speaker disappear and mutes the audio. Media with audio and visual information (like video files) have both a visibility and an audio icon in the timeline.

If you open the timeline properties for a piece of media with audio, you should see an “Audio” section, which contains audio levels. These can be keyframed, which means that music can be faded in and out and levels can be adjusted overall. Below the audio levels is a section called “Waveform,” which shows a visual representation of the audio. The keyboard shortcut for audio levels is the L key. Pressing L twice quickly will bring up the waveform.
Compositions and pre-compositions with audio have these controls as well. Because it can be confusing keeping track of what audio is in which comp, I’d suggest adding your audio to the master comp where all your shots are collected. I generally recommend adding audio after your shots are created and timed out, unless you’re doing something like a music video (in which case, the audio should be driving the visuals). Compositions with audio should render with audio once they are added to the Render Queue, although you may want to double-check this in the output module.
Need some audio files to get started? Check out the newly-added RESOURCES page, which contains links to lots of royalty-free media.
I’d like to give everyone a bit of extra time to work on the mid-semester project, so I’m pushing the deadline back to Wednesday, March 29 (instead of March 21). This will give everyone a chance to work on their projects after break next week. Use this extra time to refine your storyboards, polish your animation, and dial in the editing of your piece.
Have a great break!
Take A Trip To Toon Town
Who Framed Roger Rabbit was a landmark film for visual effects when it was released in 1988 and – surprisingly – it still holds up today. The animators on the film, under animation director Richard Williams, managed to blend hand-drawn animation with live action footage incredibly well. This video from kaptainkristian breaks down how the effect was achieved and why it works so seamlessly.
Jack’s Back
Animation auteur Genndy Tartakovsky – creator of Dexter’s Laboratory, Samurai Jack, Star Wars: Clone Wars and the director of Hotel Transylvania – returns to one of his most beloved projects with a new season of Samurai Jack, debuting in March of 2017. Acclaimed for its poetic action and unique art style, the series originally aired from 2001 to 2004.