Coding Animation
If you’d like some media to use for this lesson, you can download some fun Victorian-style woodcut art at this link.
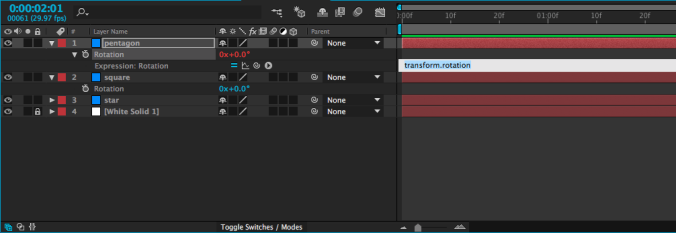
Adding keyframes is one way of animating properties in After Effects, but there is another method as well – using expressions. An expression is essentially a line of simple code that is applied to an animatable property. It’s not the same as writing computer code – you don’t need to know any specific programming language, or anything like that – but the idea is similar. To add an expression to a property, alt-click on the stopwatch icon that you usually use to turn keyframes on and off. The value associated with that property will turn red and a box of text will open in the timeline window. That window is where you add the expression.

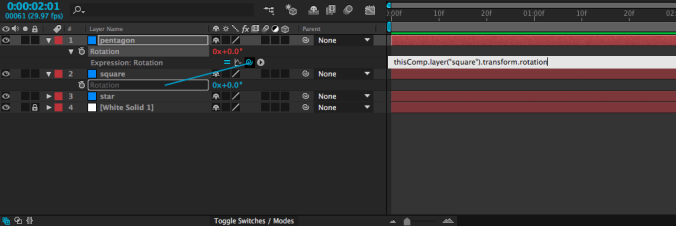
Probably the simplest kind of expression – and one of the most useful – adopts the value of a property on another layer. For example, you could take the rotation value of one shape and apply it to the rotation of another shape. When you create an expression, four small icons will appear, one of which is the swirly “pick-whip” icon that we previously used to parent layers. If you use the pick-whip to select the rotation property on a different layer and then hit “enter” (or click outside the text box), whatever value is entered for that layer will be used for the layer with the expression.

I realize that may sound confusing, but it’s fairly simple in practice. It means that you can animate a single layer and use it to affect other layers. Simply animate the first layer, then use an expression on the others. Try it out – once you get used to the process, you might find yourself using this particular expression a lot.
One small thing to keep in mind as you are entering expressions: the “enter” and “return” keys do different things. One (enter) closes the text box, the other (return) adds a line to the current expression. You can also close the text box by clicking outside of it in the timeline. If you want to remove an expression, alt-click on the stopwatch icon again and it will return to normal.

Math
One thing that’s neat about expressions is that they can be easily combined or modified. If, for example, you wanted to use the rotation expression above, but make the layer with the expression rotate the opposite way of the layer it gets linked to, that’s very simple. Just use the pick-whip to select the layer with animation, then type *-1 (multiply by negative one) after the expression in the text box and hit “enter.”

This technique can be very helpful for things like animating a bird flap its wings, since you can animate both wings with one set of keyframes. Furthermore, any changes you make to that set of keyframes will automatically affect both layers.

There are a lot more expressions that you can use to automate all sorts of properties in many different ways. One that you might come across uses the timecode of the composition, often multiplied by a number. If you add an expression to the rotation property of a layer and type time, the layer will rotate to one degree at the one second mark, two degrees at the two second mark, etc.. If you type time*100, it will rotate to 100 degrees at the one second mark, 200 degrees at the two second mark, etc.. This is a simple way to add continuous animation to a property, regardless of the length of the composition.
Get Random
I’ve been using rotation in my examples so far, because it’s an easy property to visualize. Anything that can be keyframed can be affected by an expression, though – opacity, position, scale, and even the individual parameters of effects. One of my favorite expressions, wiggle, applies random values within certain limits. It can be used, among other things, to create unpredictable, organic-seeming movement when applied to the position of a layer.
To add wiggle to the position of a layer, alt-click on the Position keyframe icon in the Transform properties. A text box will open in the timeline – in it, type wiggle, then two numbers in parentheses, separated by a comma. For example: wiggle(2,150). The first number in this expression is the frequency: 2 equates to two times per second. Entering a 3 would be three times per second, and entering .5 would be half a time per second (or once every two seconds). The second number is the amount to move. So, our position expression “wiggle(2,150)” will move an object up to 150 pixels along the X and Y axis, twice per second. If our layer were 3D, it would move on the Z axis as well.

Of course, you don’t always want random movement, but it’s occasionally extremely helpful. I’ve used the wiggle expression to animate everything from fireflies to dials on a car dashboard. You can even apply a wiggle to a virtual camera to simulate the look of handheld footage. Randomness is more powerful than you might initially realize.

I mentioned last week that wiggle can also be applied using an animation preset. These are found in the Effects & Presets panel (the same place we found the text animation presets earlier in the semester). If you type “wiggle” into the search bar, you’ll see a few different options there. The wiggle animation presets still use expressions, but they sort of do the coding for you. The presets work in conjunction with the Transform effect (in the Distort category), as opposed to the transform properties in the timeline panel.

Expressions open up a vast new world of possibilities in After Effects. The icon to the right of the pick-whip opens a window that contains dozens of “building blocks” – presets and pieces of expressions that can be combined to make very complex automated effects. Don’t feel like you need to understand what each of these does – instead, just get comfortable applying expressions. Often, online tutorials and trainings will provide expressions for you to copy and past into your own compositions. Like so much of After Effects, once you are familiar with the process, you can figure out the specifics as you go.
Project 7: Express Yourself!
Use expressions to create a composition between five and ten seconds long. You may use the provided media, your own files, or something you find on your own. Use at least two expressions; you may also use keyframes. Export the composition as an H.264 QuickTime movie, upload it to your Google Drive and send me the download link.
Note that storyboards for the final project are also due next week. These can be very simple – stick figures are fine – but they should illustrate your plans for the film. The full details of the final project are at this link. You can either email me a copy of your storyboards or just bring them to class next week.
