Read My Lips
If you’d like some media to try this with, you can download an Illustrator file, audio clip, and After Effects project file at this link.
I’m not going to lie: doing lip syncing is one of the most time-consuming parts of the animation process. Much like walk cycles, effective lip syncing involves a lot of finesse and fine-tuning – and if it’s slightly off, it just won’t look right. That being said, it’s really cool to see characters that you create suddenly speak; it makes them seem that much more alive.
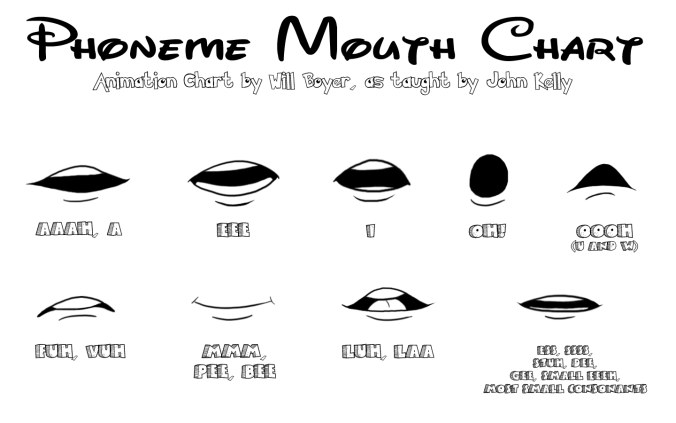
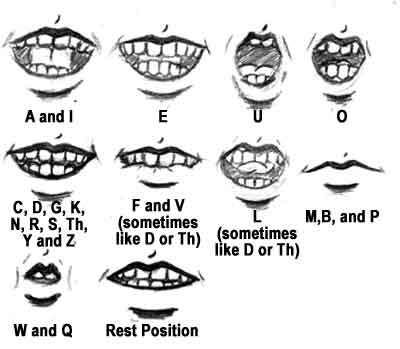
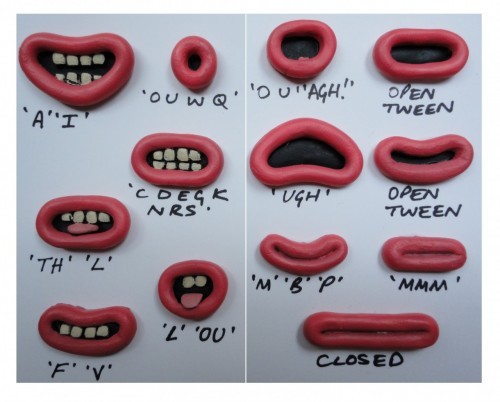
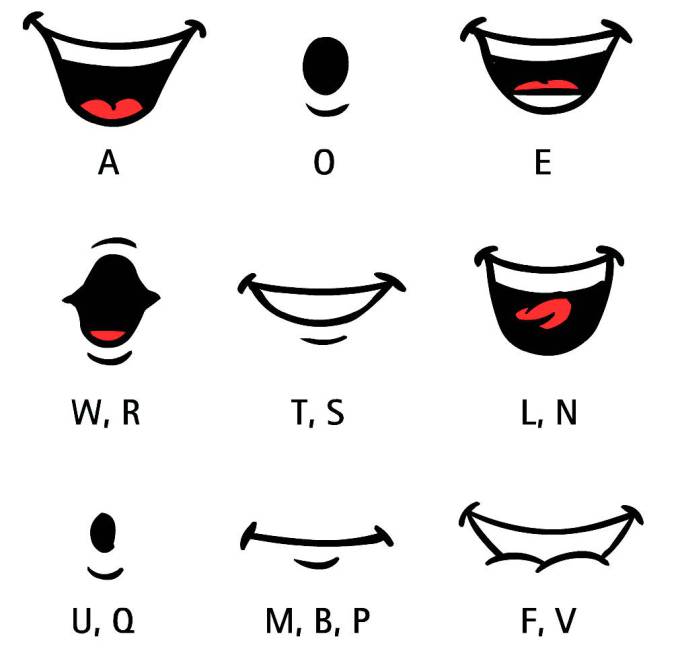
The key to good lip sync lies in using different mouth shapes for different sounds (also called phonemes). Because the mouth moves quickly when speaking, you can generally just cycle through these different shapes to make it look as though a character is voicing lines. Different sources will give different numbers of mouth shapes for lip syncing. For very simple animation, you can actually get away with just two or three: an open mouth, a closed mouth, and maybe an “oh” mouth. For really good lip syncing, however, you probably want to use six or more mouth shapes to represent unique phonemes. Here are a few mouth shape reference pictures, from various sources online:


As you can see, all of these use nine or more unique mouth shapes. The positions of the tongue, lips, and teeth make a big difference; for example, the top teeth touch the bottom lip during “f” and “v” sounds and the teeth touch the back of the top teeth during “t” and “d” sounds.
To create a lip sync animation, you should start with a pre-recorded audio track – don’t try to animate the mouth before you have the audio, the timing just won’t work. Create multiple mouth shapes for your puppet using the platform of your choice: Photoshop, Illustrator, After Effects, or something else. Use one of the guides above (or another – there are lots online) as a guide to create the phoneme shapes. Again, the more shapes you create, the more believable your lip sync will be.
In the example files I’ve provided, there are mouth shapes for the following sounds: a closed, neutral mouth; a surprised open mouth; ah; ee; i; oh; ooo; d; f; m; l; k; and th. Although I’ve labeled these shapes with a single sound each, most of them can be used for multiple phonemes. For example, you make the same mouth shape when you make an “f” sound and a “v” sound.
Lining It All Up
To actually create the lip sync animation, you simply drop the audio clip into your timeline and swap between the appropriate mouth shapes for each sound in the clip. This is the tedious part of the process, but there are a few things we can do to make things easier. First, make the waveform for the audio file visible – hit LL on the keyboard with the layer highlighted. As you animate between the different shapes, you can “scrub” through the audio by holding command on the keyboard (ctrl on PC) and moving the playhead in the timeline with your mouse. This will really help you figure out which sound come when in the timeline.
You can alternate between multiple mouth shapes in a few different ways. The simplest would probably be to just use a new layer every time. You could also keyframe the visibility of each layer using opacity. Neither of these approaches is ideal, though; both will create messy timelines that are difficult to adjust later. I’ve looked through many guides to creating lip sync animation in After Effects and they all recommend the same approach. Like many things in After Effects, it’s a little complicated to set up, but it will make things much simpler as you go.
The first step is to create a new composition with all of the mouth layers visible and stacked on top of each other. Now, these next steps will probably sound a little strange, but they’re important. Each layer needs to be a single frame long – so highlight each layer, move the playhead in the timeline to the 00:00 mark, and hit alt and ] on the keyboard – this will trim each layer to the correct length. Next, the layers need to be in sequence. You can do this manually, or by selecting all the layers and going to Animation>Keyframe Assistant>Sequence. Hit OK and the layers should move down the timeline in sequence.

Now, you need to make the composition the exact length of the sequenced layers. To do this, move the playhead in the timeline to the last mouth shape and hit N on the keyboard – this will create the end point. If your start point isn’t at the start of the composition, move the playhead to the beginning and hit B. Highlight the area between the start and end point, right-click and choose “Trim Comp to Work Area.” The length of the composition will shrink down to the length of all the layers in sequence.

You should now have a composition containing only mouth layers, each of which lasts for a single frame. Drag this composition into the composition with the rest of your puppet and position it in the correct place on the head – you may want to use a masking tool to trim unwanted areas of the composition and parent the “mouths” composition to the head layer.
Next, right-click on the mouths composition and choose Time>Enable Time Remapping. Extend the time-remapped layer so that it fills the composition (if this doesn’t happen automatically) and delete the second (only the second) keyframe in the timeline under Time Remapping. Right-click on the remaining keyframe – it should be at the very beginning of the timeline – and choose Toggle Hold Keyframe. You should see the shape of the keyframe change.


If you’ve done everything correctly, you should have a layer in your composition that allows you to switch between any of the mouth shapes you created by typing that mouth shape’s frame number into the Time Remap property. So, if your character makes an “L” sound and the L mouth shape is frame number five in the mouths composition, you just type “5” into the Time Remap value. The “Toggle Hold Keyframe” property means that the number you type in will remain until you type in a new one – After Effects won’t try to automatically animate between the keyframes.

With everything set up, animating lip sync is just a matter of slowly going through the timeline and matching up the audio with the appropriate mouth shapes. When this is done, don’t forget to animate the rest of the character as well – as people speak, it’s normal for them to move their eyes, hands, and body. Combining all of these will really make your character seem alive.

Below, I’ve collected several tutorial videos on creating lip sync animation in After Effects. Some make minor variations, but they all use an approach similar to the one discussed in this lesson. If you want to get really advanced, you can drop a slider control effect onto the mouths comp (some tutorials suggest this) and link the time remapping to it – although I personally feel like that’s an unnecessary level of complication.
https://www.youtube.com/watch?v=-RbdON3vcpk
https://vimeo.com/101931706
https://www.youtube.com/watch?v=gfj7AOz7hUM