Monochrome Life
Sometimes a limited color palette can be the most powerful. Here are a few films that showcase a monochromatic look.
Monochrome Life
Sometimes a limited color palette can be the most powerful. Here are a few films that showcase a monochromatic look.
Matt

Alec

Justin

Hugh
Bri
Sawyer

Ashley
Send Me Cool Stuff!
Throughout the semester, I hope you’ll continue to seek out interesting animation on your own. If you find something inspiring or interesting, send it my way! Thanks to Matt for sending these along.
Manipulating Layers
One very basic action that we haven’t covered yet is the editing of a layer’s in and out-points. By default, the entire length of a piece of media is dragged down into a composition and you may have noticed that there is no razor blade tool in the After Effects toolbar. Instead, to trim the beginning of a layer, move the playhead to the desired in-point and hit option [. Option ] will set the end point. (Use alt on a PC.) You can also click and drag on the ends of layers in a composition.
If you don’t hold down option, the [ and ] keys will move the layer without trimming it. [ will move a layer so that its in-point is at the playhead location. ] will move a layer so that it’s out-point is at the playhead. These shortcuts allow you to adjust the length and position of layers in the timeline very quickly, once you’re accustomed to using them.
When you’re moving or trimming layers, it’s obviously important to have your playhead exactly where you want it in the timeline. You can use the spacebar to play or move the playhead by clicking and dragging it with the mouse. For precision, you can use page up and page down to move frame-by-frame forwards and backwards. This is different from Premiere, which utilizes the arrow keys to move the playhead; in After Effects, the arrow keys adjust the position of the highlighted layer. If you hold shift and press page up or page down, you will move the playhead ten frames instead of one.
You will also probably need to duplicate layers fairly often in After Effects. This can be done by copy/pasting, but you can also use the Cmd+D keyboard shortcut. You can actually use Cmd+D to duplicate all sorts of things in After Effects: shapes, text, entire compositions, and even effects.
One last note about layers: if you double click on a layer in the timeline, it will open that layer in a panel over the composition preview window. This is actually not where you usually want to work, so if you accidentally double click on something, close the layer panel or click back to the composition preview window.
Trimming the Timeline
When you create a new composition, you are asked to define its length. If you need to change the length of the composition, you can do so by going to Composition>Composition Settings… or using the Cmd+K keyboard shortcut. Changing the duration in the composition settings window that appears will either add or subtract time from the end of the composition. However, you can also trim the composition down from within the timeline panel.
At the beginning and end of the timeline, you’ll find blue handles – these define the “work area.” (There are actually two sets of blue handles – the smaller ones can be used to zoom the view of the timeline in and out.) You can think of the work area handles as After Effects’ equivalent of an in and out point. If you drag the work area handles to the section of the timeline you want to keep, then right-click on the lighter area directly between them, you’ll see a few options appear. Select “Trim Comp to Work Area” to remove everything outside the handles and shorten the length of the composition.

Masks and Shapes
As I previously mentioned, most of the media you add to your composition will have three kinds of properties: masks, effects, and transform properties. You’ll find the mask tools up at the top of the screen in the tool bar. There are preset mask shapes (hold-click to see the various options) and a pen tool for custom shapes. Be sure to select the layer you want to mask in the timeline panel before clicking on a mask tool.
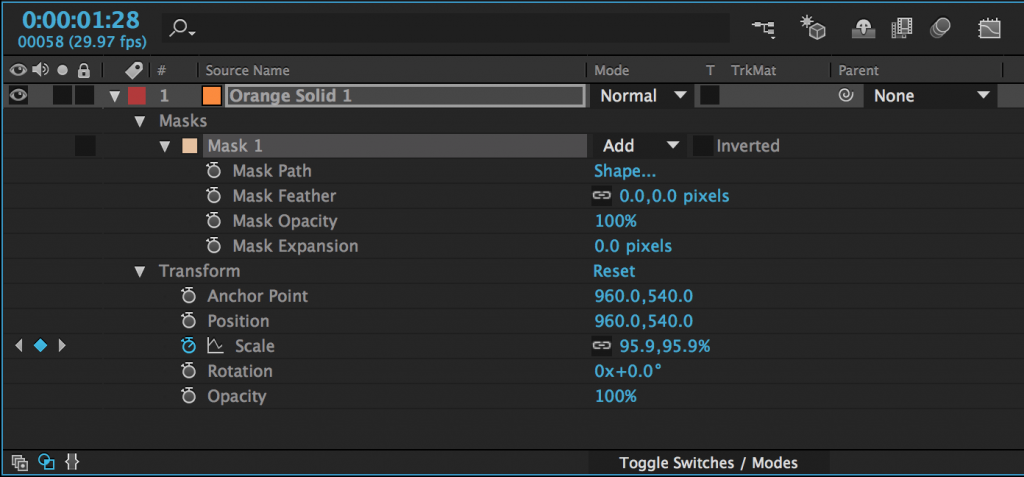
After you add a mask to an object (with either a shape tool or the pen tool), it will appear as a property of that layer in the timeline panel. Next to the name of the mask, you’ll find a dropdown menu – the default value should be “Add.” This means that the mask is “adding” that area and discarding everything else. If you change this to “Subtract,” the area of the mask will be taken away and everything else will remain. Choosing “None” will make the mask have no effect. There are several other options as well, but add and subtract masks are what you will use most of the time.
There are a number of options for further modifying the mask, which are available by clicking the triangle to the left of the mask’s name. Feather fades the edges; Opacity changes the transparency; and Expansion allows you to grow or shrink the mask.
Mask Path is the shape of the mask and by turning keyframes on for that property, you can animate that shape. When the mask path keyframes are activated, you can move the points that define the mask or adjust their bezier curves. If you click on the word “Shape…”, you can automatically change the mask to an ellipse or rectangle.
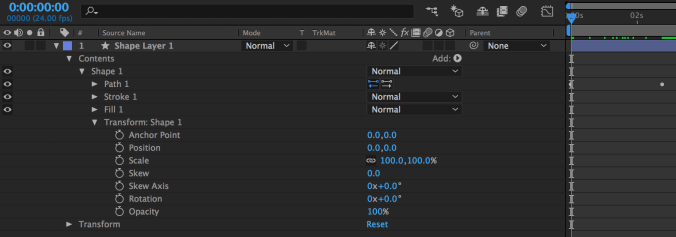
Shapes can be animated in a very similar way. If look at the properties of a shape in the timeline, you’ll see a new category called “Contents.” Under the shape’s name, you’ll find keyframe-able properties related to path, stroke, fill, and transform. “Path” allows you to animate the shape of the shape, just like the shape of the mask can be animated. Stroke and fill control the color of the shape and the color and thickness of its border. Transform is a second set of transform controls, applied before the regular transform properties. There are a few extra properties in these new transform controls; they are related to the skew, or distortion, of the shape.
Effects
There are many effects built in to After Effects and countless more that can be added using plugins. The effects are organized into categories under the Effects dropdown and in the Effects panel, which has a useful search bar. Clicking on a piece of media in a composition and then choosing an effect in either location will add that effect and should bring up the Effect Controls panel. The effect will also appear in the layer information of the composition in the timeline.
The list of effects can be found in two places. The top dropdown menu has an Effects section with all the effects grouped into categories. Simply go to the effect you want and click on it – it will be added to the selected layer. There is also an “Effects & Presets” panel (you may need to find it using the Window menu). This panel contains the same categories as the dropdown menu, but it also contains a search bar. So if you know the name of the effect you want, just start typing it into the search bar and all the possible matches will appear.
When you add an effect, that effect will appear in the “Effects” section of the layer’s properties in the timeline (under “Masks” and before “Transform”) and in the Effect Controls panel. The Effect Controls panel is best for getting your effect dialed in exactly like you want it – many effects have specialized controls and elaborate options. The timeline window is best for refining and manipulating any keyframes that you add to your effects. Remember that you can show all the keyframes that have been added to a layer by pressing the U key.

Text
In addition to media that you import, you can create layers to add to your composition from within After Effects. The most common are solids and text layers. To create one, go to the Layers dropdown menu at the top of the screen, select New, and choose Solid or Text. When you create a new solid, you’ll see a menu with options for name, size, and color.
You can create text in a composition either by selecting the text tool (Cmd+T on Mac, Ctrl+T on PC) or choosing Layer>New>Text from the top dropdown menu. You can either draw a box for the text in the composition window or just click somewhere and start typing. You can also double-click on the layer in the timeline window to begin editing the text.
The “Character” panel in After Effects contains all the usual options for modifying text, as well as some unique controls. You can change the typeface, size, fill color, stroke, and style; but you can also adjust the kerning and line spacing, add a faux bold or italics, switch to all-caps or small-caps, put text in sub- or super-script, and more. You can highlight just part of your text and modify its properties separately. There is a different “Paragraph” panel for adjusting the justification.
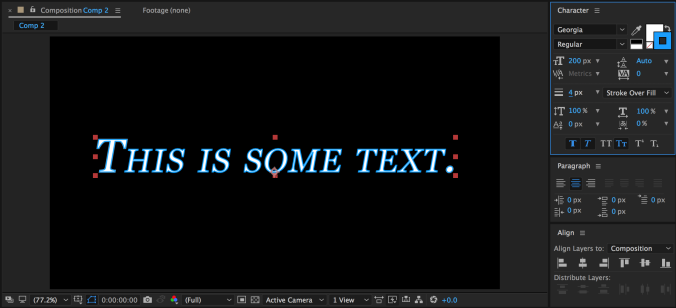
As you may remember, there are two text-related tools in the toolbar: one for horizontal text (this is what you’ll use most of the time) and one for vertical text. What if you want your text to run along a specific path, however? This can be achieved using the masking tools. With your text layer highlighted, choose either the pen tool or a mask tool and draw a mask or path. If you are using the pen tool (which is what I’d recommend), you do not need to close the path – you can simply create a line for the text to run across.
With your path drawn, click down to the “Text” section of the text layer in the timeline and find the “Path Options” section. Next to “Path,” you should see a small dropdown menu – it will say “None” by default. Open that menu and choose the path you’ve drawn – your text will snap to the path. Some options for adjusting the position of the text on the path will also appear.

Transfer Modes and Track Mattes
Those of you with Photoshop experience may be familiar with transfer modes. A layer’s transfer mode affects the way it interacts with the layers below it. There is a “Mode” section of the timeline where this can be adjusted. You may need to hit the “Toggle Switches/Modes” button at the bottom of the panel for it to become visible.
By default, the transfer mode should be set to “Normal.” There are too many options to go through individually, but they are grouped together into sections. The section with “Darken” at the top uses the dark areas of the layer to affect what is visible; the section with “Add” at the top uses the light areas. You should experiment with the transfer modes to see how layers affect each other – you can get some really interesting results with them.
Next to the transfer modes are options for “Track Mattes.” A track matte tells a layer to look at the layer above it for certain properties. The “Alpha Matte” and “Alpha Inverted Matte” are particularly useful. For example, if you put a text layer above a video layer and then set the track matte of the video to Alpha Matte, the video layer will have the shape of the text layer. Alpha Inverted Matte will cut out the shape of the text.

Animate Text
As you can see, there are many ways of manipulating text in After Effects. However, there is a whole other category that we haven’t yet discussed: animation presets. There are actually animation presets for all sorts of things, but the text presets are particularly fun. To use them, you’ll need to go to the Effects & Presets panel; *Animation Presets is the first option.
Within the Animation Presets category, you’ll see several subcategories. Go down to Text and open it up. There, you’ll see many more subcategories such as Animate In and Animate Out, Graphical, Mechanical, Organic, and lots more. Animate In and Animate Out do just that – they automatically animate the text moving on or off of the screen.
The other categories of animation presets add things like movement, graphical elements, or light effects to text. For example, the Flicker Exposure effect in the Lights and Optical category makes each character in a text layer randomly flicker. This is a fairly simple effect, but it would be very tedious to create it manually; the animation presets make it simple.
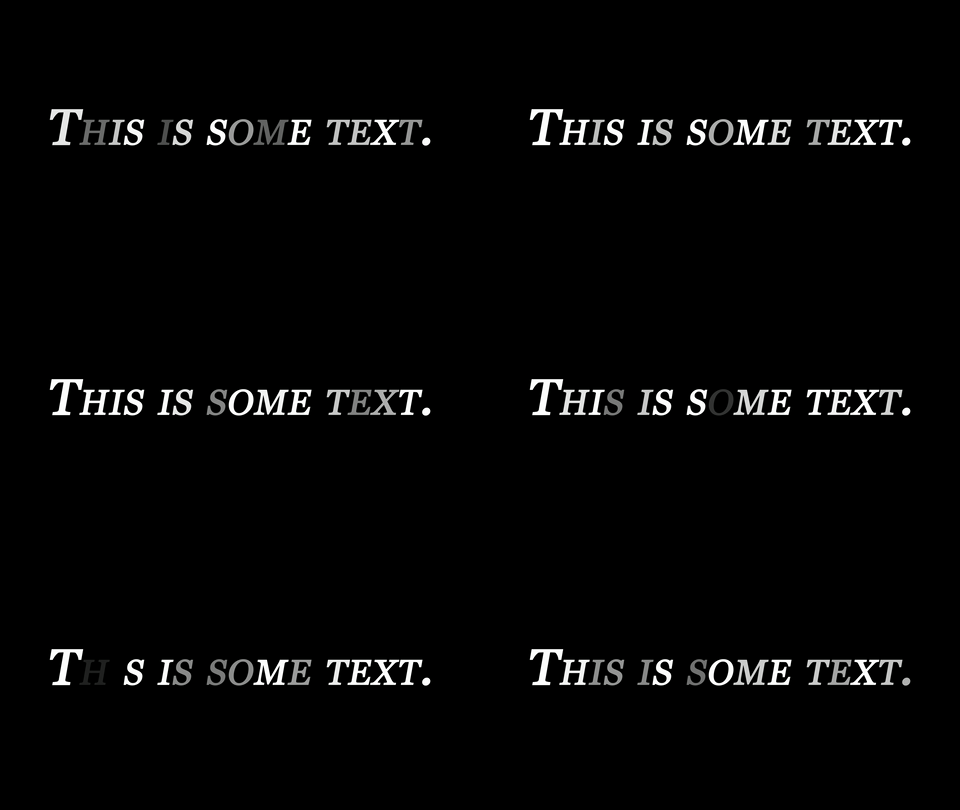
Many animation presets can be manually customized after they are applied. To do this, go back to the “Text” section of the text layer in the timeline – there should be a new section called “Animator” followed by a brief description. You can dig through the animator options to alter the animation preset, or highlight and delete it to remove it.
Project 4: Animated Wordmark
I’d like you all to create some animated text – something like an animated logo that you can use to identify your work. It can be your name, a brand name of your own creation, or any name you’d like to use as a personal identifier. If you’d like some media to use, here is some generic slow motion stock footage – although you are welcome to use any footage or other media you like.
Your finished graphic should be under 10 seconds long, feature some sort of text element, and be rendered as a QuickTime movie using the H.264 codec. If the resulting file is small enough, email it to me directly – otherwise, upload it to your Google Drive and send me a download link.


Roll Credits
We don’t necessarily think of the design of a film’s title and credits as a crucial part of the production process, but it can completely set the tone for a film. Many films have become inextricably linked to the design of their titles; think about Star Wars, Indiana Jones, or The Godfather and you immediately think about their iconic title design.
Here are a handful of videos from the excellent blog Art of the Title, where you can find essays, interviews, and videos about hundreds of television, movie, and game title sequences.